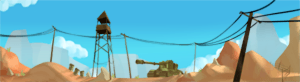
Map 1 is a 2 flag map, with the attacking team starting on the left.
Attacking[]
Your team should shoot a path through any blocks up to the flag. From there, you should get up as quickly as possible, and if you beat the opposing team, you should try to get on the right side of the tower, and quickly spawn a conj wall to your right, as well as above. While this puts you at more risk, it prevents the opposing team from getting inside the flag on the right side of the tower.
The second flag is a bit harder to take, but since the your spawn will be closer to the flag you should use conj to get over there as quickly as possible while your "spawn" immunity lasts.
Defending[]
It's important the defend the first flag for as long as possible; it's slightly color to your spawn, and if defended properly is much easier to keep hold of. At the beginning of the round, you should attempt to get up there quickly, and spawn conj in the area just above the tower. You can then use the tower's blocks + conj as a way to buy time while the rest of your team gets to the flag.
The second flag is more of a disadvantage since it's farther away, and there's a lot of blocks between your spawn and it. From the spawn, you should dig above/below the power line. Above allows you to walk along it and drop down into the flag. Below can be riskier, but if you stay off the ground you can use people going above as a distraction and shoot people from afar.
Points to consider:
- The second spawn point is behind a bunch of blocks, so if there is time or the 1st flag is about to be captured, a tunnel should be carved out from the 1st spawn point (where the 2nd flag will appear) to the 2nd spawn point, to avoid giving the attacking team ample time to capture the flag.
Key Locations[]
| Maps | |
|---|---|
| Removed | |